
User Guide
Helping you get all you need from MindNode. Learn everything from the elementary to the most advanced features, shortcuts & functions.
User Guide
Outline
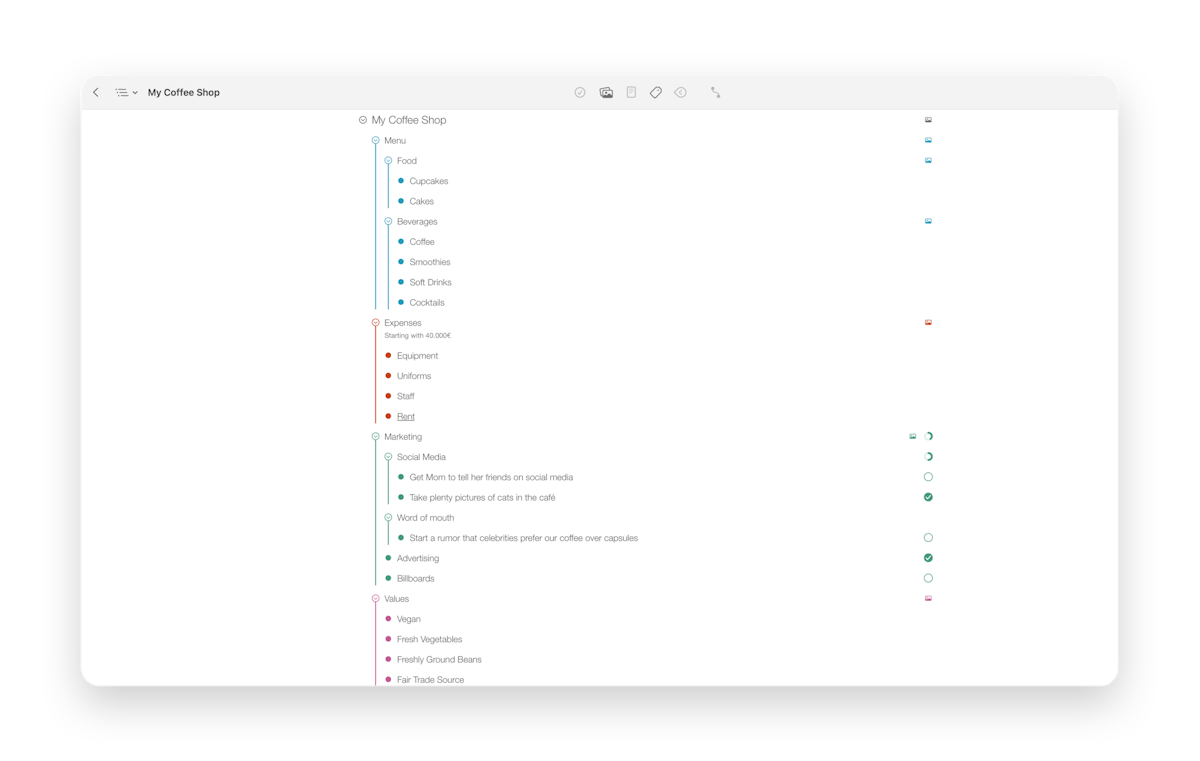
Different thoughts need different perspectives. So while mind maps create a great visual of a topic or idea, it can sometimes be helpful to see it more linearly — like a list — which is why we've integrated outlining.
You can view the outline by clicking on the View icon in the top left-hand corner of your Toolbar.
How the mind map translates into the outline: The first level child nodes of the mind map are arranged clockwise around the main node. They’ll be listed in the outline following this pattern. Each level of child nodes after that follows a top-down logic.
Nodes folded in your mind map will be folded in your outline and vice versa.
Tasks are shown to the right of the nodes in the Outline in their current state of completion. You can also toggle them there.
Notes can either be shown inline or marked with the same symbol you’ll find on your mind map.
Stickers, emojis, and images can also either be shown directly in the outline or as a symbol.
Show tags, notes, and images if you want more context, and show content indicators if you want more information about what the node contains by enabling/disabling it on the right side of the filter bar at the top (iOS)/bottom (Mac) of the outline. Here you can also change the sizing of the outline or choose to Show only open tasks.
- Mac
- iPad
Selecting & organizing nodes in the outline
If you want to rearrange the structure of the outline, here is how you do it:
- To select a node in the outline, click/tap on it once.
- You can use the up and down arrow keys to navigate the outline. For example, press Shift ⇧ + up/down arrow key to select more than one node.
- Pressing the down arrow next to the node's name will fold its child nodes. Once you've done this, the arrow will turn to the right.
- Press the arrow (now pointing to the right) again to unfold the nodes' child nodes.
- Delete a node by pressing Backspace, also deleting its child nodes.
- To remove a node and reconnect its child nodes to the above parent node, press Option ⌥ + Backspace.
- To change the order of your nodes in the outline, you can drag them to their new position relative to other existing nodes and release them there.
- Or, you can use Command ⌘ + up/down or left/right arrow keys to move them around.
Editing nodes in the outline
You can now, of course, also edit and change the content of your outline:
- Click/tap directly onto the node title in the outline or press Command ⌘ + Enter ⏎ to edit a node.
- To add a line break within a node, press Option ⌥ + Enter ⏎.
- Split a node into two by pressing Enter ⏎.
- Or, if you want to merge two neighboring nodes, press Backspace at the beginning of the second node.
- To create a new node on the same level, press Shift ⇧ + Enter ⏎ or just Enter ⏎ at the end of a node.
- You can delete a node while text editing by pressing Command ⌘ + Backspace.
- To end the editing, click somewhere outside the node title or press Esc.
Last updated on
Print User Guide